Transit of Mercury 2016

Today was the transit of Mercury 2016. I had two set-ups today – my Coronado Ha PST telescope with my ASI120-MMS camera in it and my Meade 127mm refractor with a white light filter on it, on this scope I tried my Atik 460 and Canon DSLR but none of these images came out that well, these cameras are just not made for solar imaging, all images from these cameras were too bright.

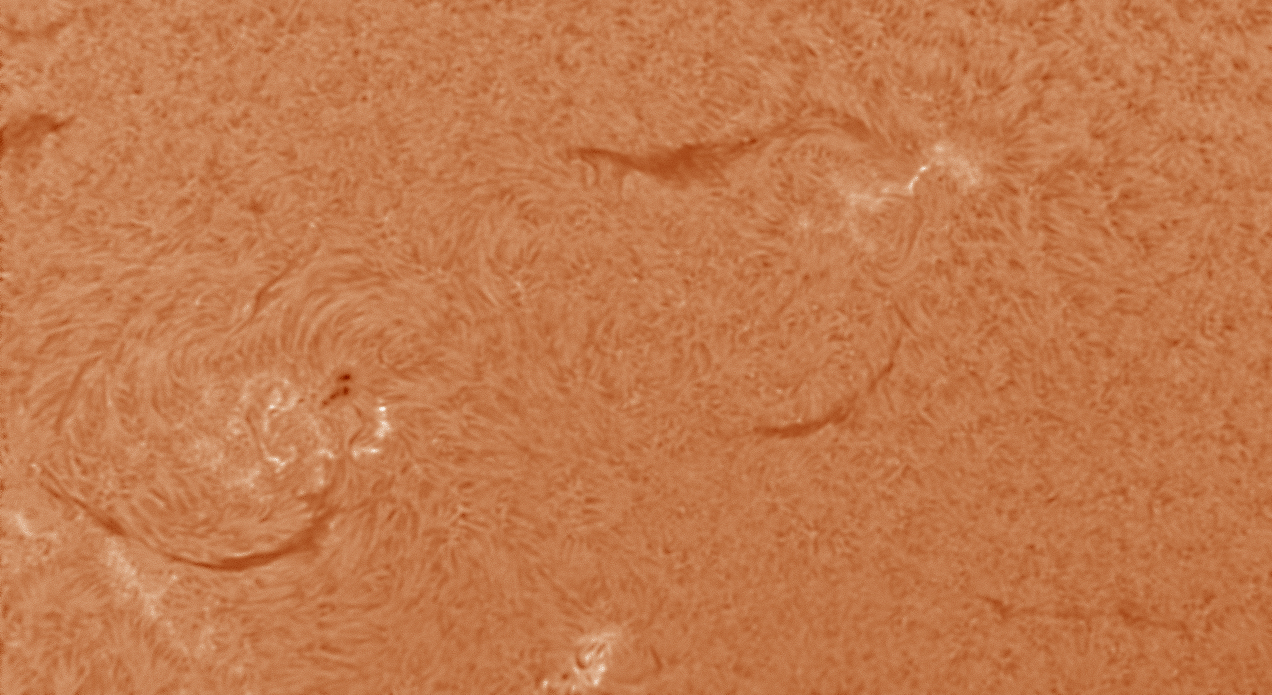
I imaged the transit of Mercury with the PST on its own and with a Televue 2.5x Powermate. The problem with the PST is that it does not do well when trying to image the whole of the solar surface as the etalon does not cover the whole of the solar disc so you can get bright and dim areas of the surface. The Coronado PST works best with the Televue 2.5x Powermate.

Previously I used a lot of the Imaging Source DMK CCD cameras, and I never really suffered from Newton’s rings. Thing is now I have an ASI120 camera which is a CMOS camera, it does seem to suffer badly with Newton’s rings. When trying to remove the rings it seems you can either buy a tilt adaptor or take flat frames.

I have always taken flat frames for deep sky imaging, but never for solar, lunar or planetary imaging. I did try taking some dark frames to remove the Newton’s rings but that never worked. Taking flat frames does work though.

I only tried taking flat frames when I took zoomed in images of the Sun with the 2.5x Powermate. You begin taking your normal video and then keep all the settings the same but just de-focus your telescope and then take a video of exactly the same length of time.

All the work is then carried out in AutoStakkert. Begin by loading your video of the de-focused Sun and select “Image Calibration” > “Create Master Frame” – then you will be asked to name the TIF file. Once completed you can then select “Image Calibration” > “Load Master Flat” and load your TIF file. Then load your AVI or SER video file and process it normally. You will now see all your Newton’s Rings disappear and your dust bunnies or doughnuts will also have disappeared.

It’s a pain to keep having to remember to take flat frame videos all the time, but as long as you don’t change your field of view or exposure, gamma or gain settings you should be OK and be able to use the same flat frames.

Mercury Transit

Solar Surface Details

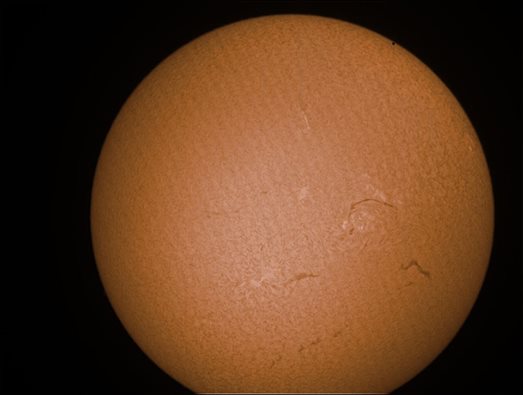
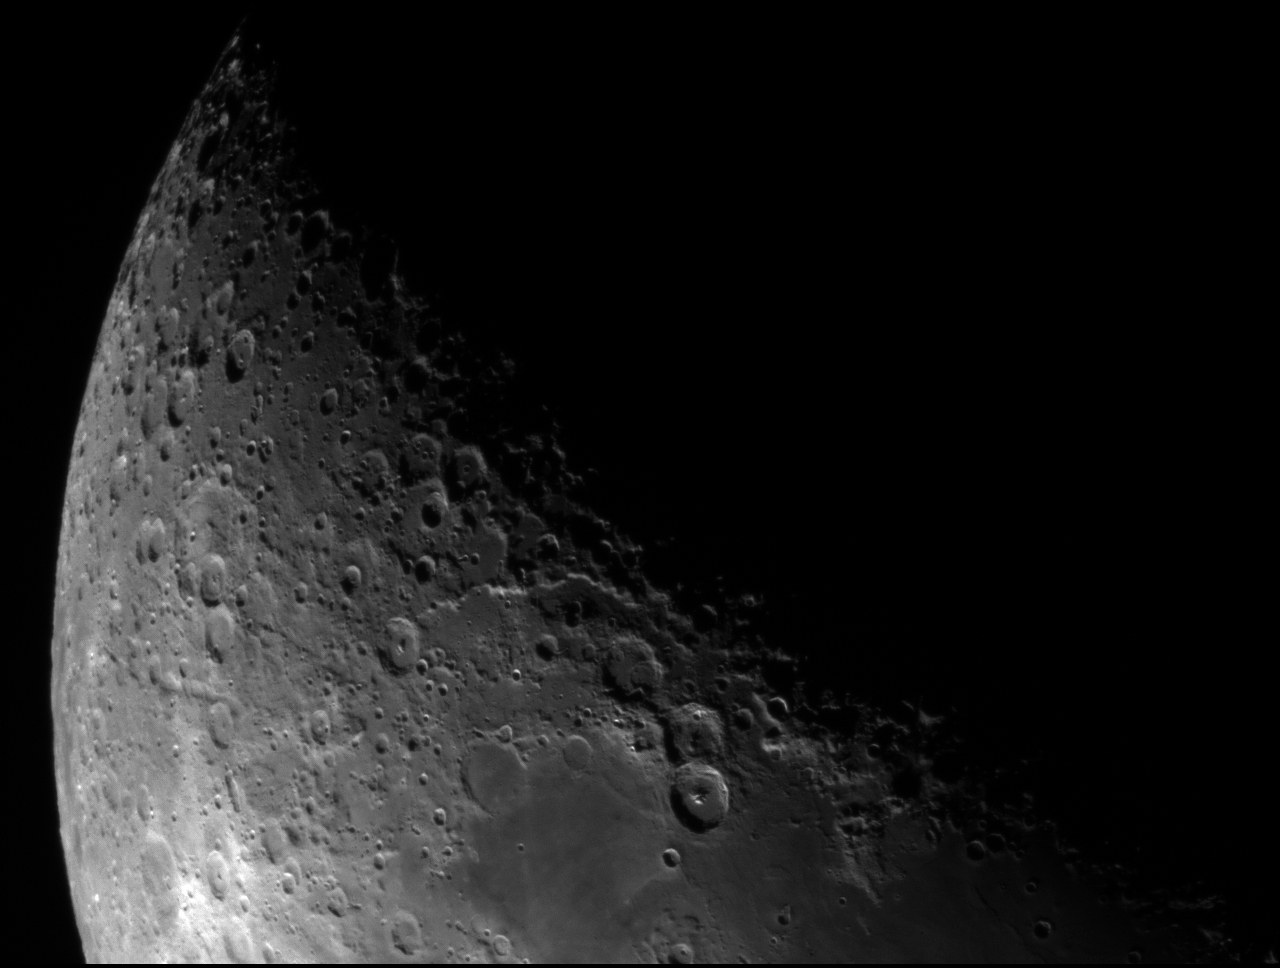
Mercury on this is at the top right hand corner, taken very close to first contact.

full solar mercury transit

A and F Type Stars Talk

On Saturday I did another talk for the Cambridge Young Astronomers. This months topic was covering the Hertzsprung–Russell diagram and explaining all the different star types within it. I was given A and F type stars for my talk.

Hertzsprung Russell Diagram

I started by looking at the Hertzsprung–Russell diagram and then gave facts on A and F type stars. I then picked an A and F type star example and explained more about the stars. My example of an A type star was Vega and my example of an F type star was Polaris.

I have put a copy of ‘A and F Type Stars’ talk on the downloads page if you want to have a look at it.

Building and Using Binoscopes Book Review

building and using binoscopes book reviewThis is a book review of Building and using Binoscopes by Norman Butler. If you love observing the heavens and have ever tried using a binoviewer then you will know how building a binoscope would be the next logical step.

Binoviewers are binocular type contraptions that fit into your telescope viewer and provide you with two eyepieces to look through just like a pair of binoculars. The only downside to using binoviewers is that you need to purchase 2 of every eyepiece and make sure they match. But the upside is that the viewing is a lot more comfortable, you can open both eyes and doing so gives the heavenly object you are viewing an almost 3D feel. I can really recommend giving a pair a go.

But one step on from binoviewers is actually bolting together two telescopes and putting them close enough together so that you can look through both at the same time (mega binoculars!).

Binoscopes are not a new idea, they have been around since the 1920’s. This book covers binoscopes in several different ways – from the point of view of building them yourself from scratch, buying two telescopes and mounting them together or actually purchasing a binoscope from a well known manufacturer like Vixen.

The book begins with the question, Why Binoscopes? It then goes on to look at optical design for binoscopes. There is then a chapter called Binoculars are Binoscopes, which looks at the similarities between the two as well as looking at building downward binocular mounts.

Building and Using Binoscopes is packed full of weird and wonderful images of various binoscopes that have been homemade from around the world. There is help and ideas on making your own binoscopes themselves as well making the mount and drive for them.

The single appendix includes a range of astronomical equations.

This is a very quirky book, and a topic I would have never thought there was a printed book on. But if building a binoscope interests you whether it’s from scratch or by putting together two purchased telescopes then this book is really for you.


Buy this book from Amazon UK

New Geoptik Adaptor Videos

I have just uploaded 2 new Geoptik videos. There are now 4 in the series (so far).

1. Unboxing the Geoptik CCD to Canon Lens adaptor
2. How to set up the Geoptik CCD to Canon Lens adaptor
3. How to focus the lens on a Geoptik CCD to Lens adaptor
4. Setting backfocus and some example images using the Geoptik CCD to lens adaptor

You can view Geoptik videos here, or on my YouTube Channel or on my Geoptik video playlist on YouTube.

Moon taken with ASI120 and Meade 127

This is part of the moon I took using my 127mm Meade telescope and an ASI120MM-S camera. There was a fair bit of atmospheric turbulence, but without using any amplification the moons surface seemed quite still.

The ASI120 camera at full pixel size does use a lot of disk space when recording at anything over 60fps. That night I did a few moon videos and a couple of Jupiter videos and ended up with 20GB of video data.

I used FireCapture to take the video, which seems easy to use – as easy as SharpCap anyway. I processed the video in AutoStakkert and then moved it to Registax and finally Photoshop. I am not a big user of AutoStakkert, but I do find that it can cope with large video files sizes and most file types and codecs whereas Registax can be a bit funny about the type of AVI you send it. Registax also does not seem to like large GB file sizes whether you use Registax 5 or Registax 6.

Moon Wide using Meade 127mm

IC405 Flaming Star Nebula using Geoptik Adaptor Canon Lens

This was my 3rd image using the Geoptik adaptor and my Canon 70-300mm lens. For IC405 Flaming Star Nebula I decided to move to 200mm zoom, I had tried 200mm on IC405 on the 1st night and I was not happy with the focus, or the shape of the stars. On the 2nd night my TeleFokus from Telescope Service arrived to make focusing easier (but more about that in a later post).

This time on 200mm I set the f stop to f/7.1 I was worried about going any slower than f/7.1 as I would be gathering less light and losing sharpness.

I ended up binning 2×2 and taking 300 second exposures. This image below of IC405 Flaming Star Nebula included about 20 exposures. This was also guided this time. I am still not sure about it, but may add OIII exposures to produce a bi-colour image to see if that improves it. I have also been looking at expensive Canon lenses now, like the Canon 200mm f/2.8 prime lens and the Canon 70-200mm f/4 lens.

IC405 Flaming Nebula

Orion Nebula and Horsehead Nebula

Orion nebula and Horsehead nebula in Hydrogen Alpha. I used a Canon 75-300mm lens set to 100mm at about f6 attached to a cooled CCD camera via an Geoptik adaptor. This image was consists of 15 x 300 second exposures unbinned that were also unguided.

The Orion nebula has always been tricky as it’s core is so bright. This was still a problem in this widefield image, as Orion is still bright and the Horsehead is very dark. I still used DPP in Maxim DL when processing this, then just tweaked the levels, brightness, contrast and sharpened it in Photoshop.

Orion Nebula and Horsehead Nebula

Heart and Soul Nebula IC1805

Heart and Soul Nebula IC1805 in Hydrogen Alpha. I used a Canon 75-300mm lens set at 100mm. The Canon lens is attached via a Geoptik adaptor to an Atik 460EX mono camera.

This image consisted of 10 x 600 second exposures taken on a Skywatcher EQ8 mount. The images were unguided, but I did see some drift across the exposures so I would guide next time.

It’s really difficult to focus precisely with a standard Canon lens, especially in Ha when you need greater exposures to make out the stars on the screen.

IC1805 Heart and Soul Nebula

The Moon by Eye, Binocular and Telescope

On Saturday I did another talk for the Cambridge Young Astronomers. This months topic was our nearest neighbour. I chose what you can see on the Moon by naked eye, binoculars and telescope.

I started by looking at the main seas or Maria on the surface of the moon that you can see with the naked eye. I then went onto looking at lunar craters including Copernicus, Kepler and Tycho. I then showed an image of their location on the moon as well what they look like through a telescope.

the moon talk slide
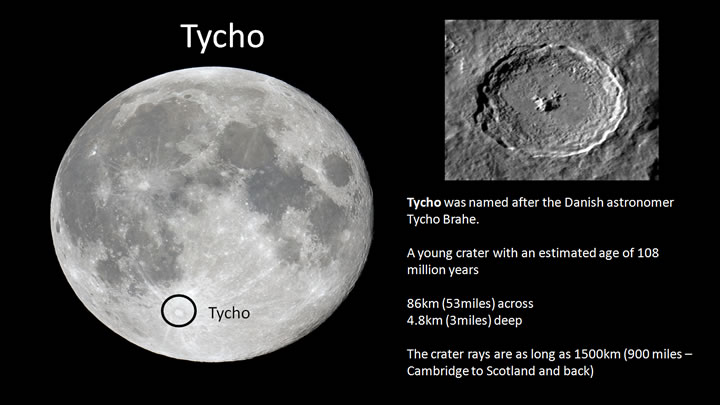
Whilst focusing on Tycho I found some amazing images that the LRO (Lunar Reconnaissance Orbiter) took of the centre of Tycho, it’s mountain range and then it had an even more zoomed in image of a boulder on the top of the mountain range that was 120m wide.

I then moved onto looking at the Apollo landing sites and looked at Apollo 15 landing site at Hadley Rille with an image that I took on my 8″ RC telescope. I then showed a quick video of the phases of the moon which were sped up to illustrate the best time to view the moon along the terminator line.

I have put a copy of The Moon PowerPoint talk on the downloads page if you want to have a look at it.

Patrick Moore Observers Year Book Review

366 Nights of the Universe Book Patrick Moore’s Observer’s Year: 366 Nights of the Universe

The original text of this book was written by Patrick Moore, and the majority of the text has not been touched but the data has been updated. This version of the book contains data from 2015 to 2020.

There is a page for every day of the year in this book. Each month begins with a look at the sky with the initial pages detailing the constellations in the sky, then there is a list of what to look at throughout that month.

Each day of the month gets its own page. You may just find written text for a particular day or a constellation diagram with a list of objects to view in that constellation. On a particular day you may also get a small box detailing Future Points of Interest – something that will happen on that day in the future, like the ‘Earth at Aphelion’ or the Opposition of Pluto’ in a particular year on that day. The number of pages per day is not massive; you may find that there is just one page or less per day. That means it’s not an arduous read, you could just read a page a day.

There are 3 appendices, a list of the 88 constellations, one with the Greek alphabet and a glossary.

I like the fact that you can pick this book up every day and have a quick read of what you can look at tonight in the night sky, at the same time the book improves your overall astronomical knowledge day by day.


Buy this book from Amazon UK