Archive for January, 2008

Apologies to anyone who visited in the last hour (between 2.30pm - 3.30pm) and got a blank white page. 

I moved the astronomy blog from a shared hosting account to a new web server.  Hopefully everything should be fully working as usual, if not, then there may be the odd bug to iron out.

I know this may be a bit late, but as soon I knew about the Asteroid TU24 passing the earth, I went into Starry Night Pro to try and find the asteroid, but it was not in the program, so I went to Meade Autostar Suite and again I could not find the TU24 asteroid in the library.

So whilst searching around the internet I found a way to add the TU24 co-ordinates to Stellarium, so you can locate the asteroid.

Asteroid TU24 Sky Map and Star Map
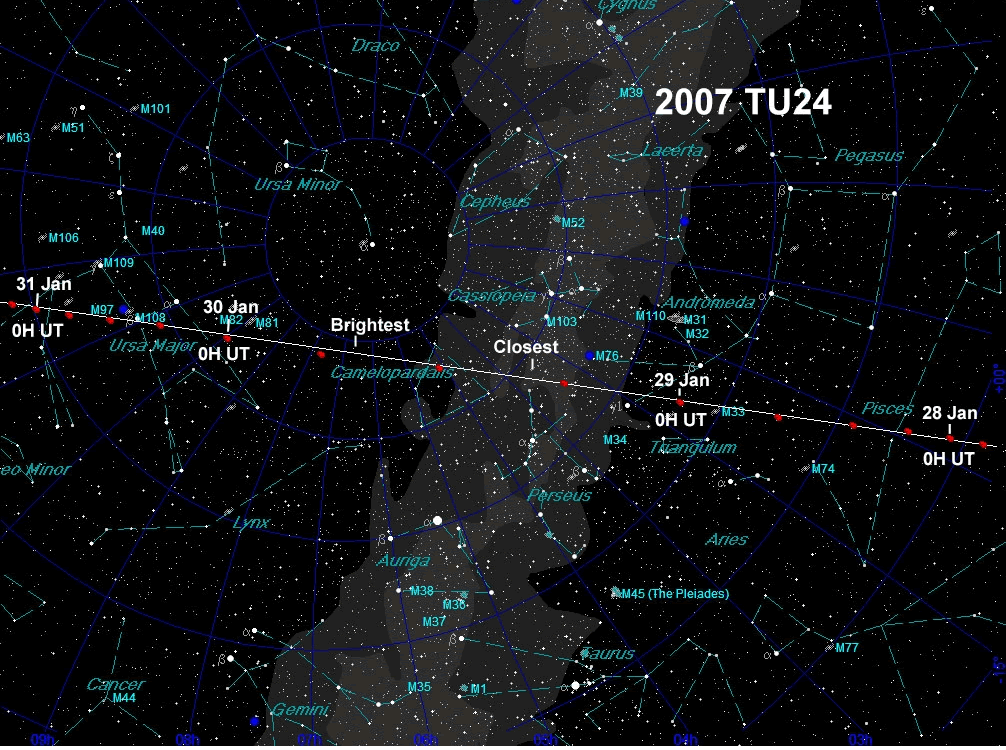
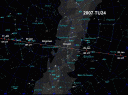
Otherwise if you don’t want to install Stellarium (which is free!), take a look at this star map of where to look in the sky, click on it to see the enlarged version.

This map will show you the position of TU24 during the days of 29th and 30th January 2008, and so should help you find out where to look in the sky, if we get a chance to see it, with all this cloud and rain about at the moment.

1. Install Stellarium

2. Locate the file called ssystem.ini, in Microsoft Windows this is located in the folder C:\Program Files\Stellarium\data. Open the file in a text file editor, such as Notepad, and at the end of the file add the following lines of code:

[2007 TU24]
name = 2007 TU24
parent = Sun
radius = 0.124
oblateness = 0.0
albedo = 0.113
lighting = true
sidereal_period = 1040.25
halo = true
color = 1.0,1.0,1.0
tex_halo = star16×16.png
tex_map = nomap.png
coord_func = comet_orbit
orbit_Epoch = 2454200.5
orbit_MeanAnomaly = 265.6255185
orbit_SemiMajorAxis = 2.00968916
orbit_Eccentricity = 0.528994467
orbit_ArgOfPericenter = 333.5938528
orbit_AscendingNode = 127.1794738
orbit_Inclination = 5.8015979

3. Save the file

4. Start Stellarium, use the search facility (magnifying glass) and enter 2007 TU24. The asteroid will then appear in the program.

5. Stellarium with then tell you the current RA and Dec positions of TU24 in the upper left hand corner once you have locked onto the asteroid. So you could then enter and save these positions into Autostar under User Objects, in order to give you a starting point to locate the asteroid, then just Sync on it, once your telescope finds it.

Sky at Night Feb 2008 Magazine IssueIt appears my February issue of The Sky at Night magazine is a bit late, as it has not arrived yet. So far a week overdue. I have only had 4 issues so far in my subscription and they usually appear on time.

I have now emailed the magazine team and also left a message on the magazine forum, where a couple of other people are also missing their issues.

I did also have to email the helpline previously when my free Sir Patrick Moore autobiography book that was offered with my subscription never turned up after four months, but about a week later the book arrived.

Delivery Update

After emailing skyatnight@servicehelpline.co.uk I have managed to get a response after about 24 hours, telling me that my subscription is up-to-date, and all issues have been sent out.  Apparently a replacement copy has been sent out and this should take 7-10 days to arrive.

8th February 2008

My magazine finally turned up today, and as I ended up logging two queries I have received two copies. The funny thing is that the next copy is out on 19th February, which is only only 11 days away.

Meade DSI ProI had been looking out for a Meade DSI for a while, although I did not want to pay the full retail price, that meant looking for a second hand model, either on eBay or AstroBuySell.

I ended up buying my DSI Pro from eBay, and there was a bit of confusion between what model it was that I was actually buying. The seller said it was bought from Green Witch about 3 months ago, which led me to think it would be a DSI II. Although it wasn’t! It was a DSI Pro version 1, although I suppose at around £150 it was probably a good buy.

It turned up quickly and was missing the parfocal ring, but after a few emails, the seller found the parfocal ring and posted it on.

To begin with the DSI looks really complicated to use and it’s another computer software program that I need to learn how to use.

I first thing I did after installing the Autostar Suite, is that I printed out the manuals, as they only come on the main CD as PDF documents.

So far I have read the manuals and watched the online Meade videos, but I think it would have been good if Meade had included some kind of “How To” PDF or video as opposed to telling you how each menu works or what each button does.

I did not get the CCD filters in the sale, so now I am on the lookout for some Meade CCD RGB filters.

Mars Figure taken by NASA Spirit

These amazing images were among many sent back to Earth by Spirit, Nasa’s Mars explorer vehicle which landed there four years ago.

Zoom image of Mars image

The images have been featured in the UK newspapers this week and are very interesting, but surely they are just rocks which have formed on the red planet into a human type form which we recognise as a female form sitting down with the outline of an arm and a leg.

50 Best Astronomy Sights BookEach of the 50 sights are given their own chapter in this book with these chapters then divided into sections based upon the field of view, and thus what you need to use to see each sight. This includes the naked eye, binoculars, small and large telescopes.

Each of the fifty sights is given several pages each, and each sight is well described together with tips on how to see the sight.

Such sights covered are solar and lunar eclipses, the Pleiades, Andromeda galaxy, Jupiter, Great Orion Nebula, Venus and The Milky Way.

‘The 50 Best Sights in Astronomy and How To See Them’ is great little book, and will give beginner astronomers a great insight in what you can see and what to look out for during the astronomical year.

Most of the images in the book are in black and white except for a few colour glossy pages that can be found in the middle of the book.

The book also contains five small appendices covering a list of total solar eclipse dates up to 2024, major meteor showers throughout the year, total and partial lunar eclipses, the brightest stars and the transit dates of Mercury and Venus.

Overall ‘The 50 Best Sights in Astronomy and How To See Them’ is a useful beginners book but it would have been nice if each sight could have been presented with a colour photograph.

The 50 Best Sights in Astronomy and How To See Them can be purchased at Amazon

Great Orion Nebula M42

9th Jan, 2008

I managed to get outside again last night and try out my focal reducer and 40mm Antares eyepiece for the first time. The Orion Nebula was a good choice to view as now the whole nebula was visible in the eyepiece by using the focal reducer which reduced the focal length to f6.3 from f10.

Orion Nebula Map from Starry Night

The Orion Nebula M42 can be found beneath Orion’s belt (which is the three angled horizontal type stars) .

The Great Orion nebula is situated at the middle of the three smaller vertical stars underneath the belt.

The Great Orion nebula is situated in what is known as the hilt of Orion’s sword.

The diagram is taken from Starry Night Pro.

I then used my Canon DSLR at prime focus to take the two photographs below, both were at ISO800 and both were at varying exposure times, both around the 15 second mark.

I was very happy with the focal reducer and the 40mm eyepiece and can’t wait to use them on the moon.

Orion Nebula

Great Orion Nebula - ISO800 - f/6 Focal Reducer used on 10″ LX200

I recently purchased a second hand Hartmann mask together with an ETX90 solar filter from astrobuysell. Today I had my first chance to try it out and view the sun.

LX200 with Hartmann Mask and SolarThe Hartmann mask covers the front of the LX200, just like the telescope cover. It contains three screws which are tightened so that the mask cannot be accidentally removed or fall off. The solar filter screws into one of the masks three viewing holes. The glass solar filter is actually designed primarily for use by the ETX90 telescope.

I had no idea of how to get the LX200 and autostar to find and keep track of the sun. I had never used the telescope before in the daytime. I began by letting the LX200 go through it’s set up procedure and then just pressed ‘Enter’ when it asked me to align to the brightest star. I then looked on Starry Night Pro for a star near to the Sun, and selected that.

It was difficult to know where the telescope was pointing, so I also looked on Starry Night Pro to find out the RA and Dec positions of the Sun. I then entered these into Autostar and had the telescope slew to this position. After a little tweaking I found the Sun in the eyepiece.

I initially decided I was only going to view the Sun through my Philips web cam, but after not being able to get an image through the web cam I decided to view the sun through the eyepiece using my 40mm Antares eyepiece.

I had already fitted my f/6.6 focal reducer to the telescope which allowed me to view the whole disc of the sun in the eyepiece.

I then swapped out the eyepiece and inserted my webcam, but did not manage to get the sun to display on the laptop, nor did I manage to use my Canon DSLR to get some images. So instead I just put my Canon IXUS up to the eyepiece and took a photo, and here it is:

The Sun with 40mm Eyepiece taken using Canon IXUS500

As you can see there are no distinguishing marks on the image, perhaps some new filters will change this, as I have been reading a lot about H-alpha pass filters and Solar Continuum filters.