Archive for August, 2008

Rainbow Spotting

23rd Aug, 2008

During heavy rainfall and Sun at the same time on Friday 22nd August 2008, at around 6pm, I looked around the sky for a rainbow, and there it was at the back of my house, with more bands of colour than I can remember ever seeing.

Rainbow Colour Bands
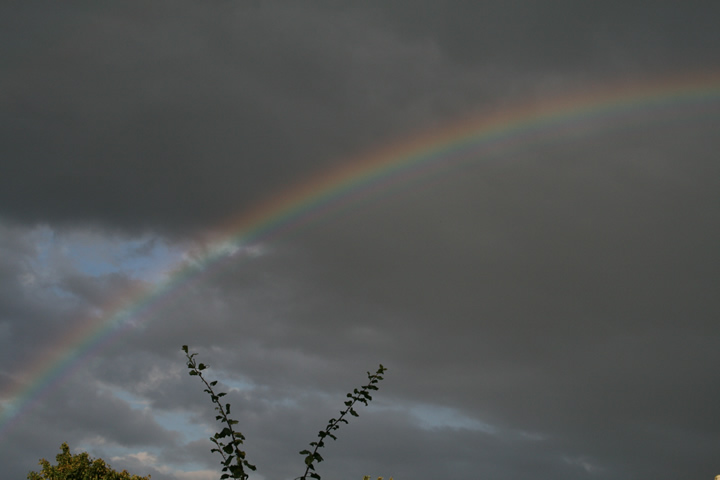
“A supernumerary rainbow is an infrequent phenomenon, consisting of several faint rainbows on the inner side of the primary rainbow, and very rarely also outside the secondary rainbow. Supernumerary rainbows are slightly detached and have pastel colour bands that do not fit the usual pattern”. Is this photo below a supernumerary rainbow? It does seem to have a lot of colour bands.

Double Rainbow

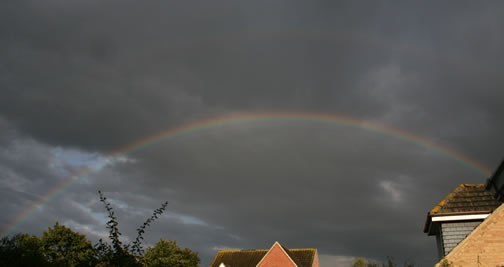
The main image even shows a second rainbow trying appear above the main one, this is called simply a double rainbow. Two rainbows in the same sky is also something I have never witnessed before.

Apparently secondary rainbows are caused by a double reflection of sunlight inside the raindrops, and appear at an angle of 50°–53°. As a result of the second reflection, the colours of a secondary rainbow are inverted compared to the primary bow, with blue on the outside and red on the inside.

It is remarkable how quickly a rainbow can appear and how quickly it can fade away and lose it’s intensity and the number of bands of colour.

Rainbows are optical illusions and meteorological phenomena that cause a spectrum of light to appear in the sky when the Sun shines onto droplets of moisture in the Earth’s atmosphere. They take the form of a multicoloured arc, with red on the outer part of the arch and violet on the inner section of the arch. More rarely, a secondary rainbow is seen, which is a second, fainter arc, outside the primary arc, with colours in the opposite order, that is, with violet on the outside and red on the inside.

National Space Centre Rocket TowerMy family and I visited the National Space Centre at Leicester in August 2008. I decided to go once I found the venue on the Tesco Clubcard site, so if you are a Tesco customer, then I recommend trading in some of your Clubcard points and save some money on entrance (if the Space Centre is still on the Tesco Clubcard site), also be ready to pay £1 for parking, but the price covers the whole days parking.

You can see the National Space Centre in the distance when driving to it as the main rocket tower stands out on the horizon. The tower actually contains two full size rockets, and you can actually have your lunch underneath the rockets in the restaurant.

Soyez in receptionAt the entrance you are greeted by a hanging copy of one of the Soyuz satellites. After getting through the turnstiles you are then in the main exhibition areas, with each zone containing a new space topic. You can see space suits, astronaut menus, models of the ISS and more. 

The main draw for me was the planetarium, and I think it was the best thing, we got one free visit to it which is included in the entrance price, other showings are charged at £3 each.

The main show in the planetarium was called “Life of stars” this was amazing with spinning objects that made you dizzy and introducing you to the history of astronomy, and the planets and our solar system and it was narrated by Mark Hamill.

I did attend another show entitled “Guide to the night’s sky”. The lights where turned down and the stars lit up, the narrator Becky, introduced us to several constellations and stars and the history behind them, great if you want to learn the basics about the night’s sky.

We also attended a talk on a future rover mission which will be heading to Mars called ExoMars.

Looking up at the rocket towerThe rocket tower not only includes two rockets but also has various things to see on each of the 3 levels via an open glass lift, this includes some real space engines, a Beagle 2 presentation and suspended satellites as well as other interactive games. 

There was absolutely lots to do including playing with a remote control mini Mars rover, and watching some funny footage from the original Moon landing, as well as lots of interactive learning. There was also a great display of Heinz Beans cans which were all weighted according to what planet you were on.

The final part of the centre is a space astronaut cadet training area which includes a 3D space ride a bit like a ride from a Florida theme park, which should not be missed. There were also other challenges such as collecting as many space rocks as possible using a mechanical digger in a set time.

The National Space Centre is a great place for children to learn about the solar system, as there are a lot of interactive learning tools scattered around the centre, and even Lunar Jim sections for younger children.  But don’t think it is only for children, as there is a lot here for adults as well.

Even the hand washing facilities in the toilets were futuristic as you put your hands in a hole in the wall and the soap is dispensed and then comes the water and then the dryer, all in one.

There is also the shop near the exit which stocks a range of astronomy gifts, learning toys and more.

Overall a great day out for astronomers young and old.

View all my photographs from the National Space Centre.

The Magnetic Sun

16th Aug, 2008

“The Magnetic Sun.” Dr Alice Courvoisier was the title of the August 2008 Cambridge Astronomy Association talk. 

A diagram of the sun explained each named part of the Sun including the photosphere, chromosphere, filament, convective zone, radiative zone and prominence.

It was also explained to us that the solar material in the Sun is a plasma and so conducts electricity.

The lecture included of course sunspots, and it was interesting to find out that the actual recording of sunspots did not begin until 1610. William Herschel thought that sunspots were openings in the Suns atmosphere.

The centre of a sunspot is called an Umbra whilst the outer part is called the Penumbra. The Umbra appears darker as it’s cooler than the other parts. We were also told that sunspots appear in pairs which have opposite polarity. There is an 11 year sunspot cycle and the polarity of the sunspots also reverses after 11 years.

The talk then asked the question can we predict solar activity? This section ended by quoting “At the moment there appear to be too many uncertainties in the current solar cycle models to allow for sound predictions”, which was taken from a Nature article.

We were told that solar winds are when the Sun expels a million ton of particles which are threaded by magnetic fields.

Solar activity can also cause problems for us on the Earth, as geomagnetic storms induced by solar events can interrupt radio, satellites, cause power cuts and damage pipelines. . In March 1989, 6 million Canadians lost power for 9 hours because of the Sun’s magnetic activity.

Overall this was an interesting talk that taught me more about the Sun than I knew.

Alice first came to the UK to follow a masters course at Cambridge University in 1999. Then, after a two year break teaching physics in Madagascar, she came back to do my PhD in the Department of Applied Mathematics at Leeds University, which she completed in 2006. Alice is currently working as a post-doctoral research associate in Leeds; where her main interest is trying to understand the origin on large-scale magnetism in astrophysical bodies.

After buying my Panasonic SD9 HD camcorder I was thinking if it could be used for astronomy. I wondered if I would have to take a trip to my local astronomy store to see if they had anything in stock to allow me to connect my camcorder to my LX200 telescope.

In the same way you use a Ring on an SLR camera with a T mount I thought there may be the same thing for my camcorder, I definitely did not want one of the metal contraptions that are used to attach compact digital cameras to telescopes (more commonly known as an Ultra Afocal Digital Camera Support).

37mm T-mount adaptor to attach camcorder to telescopeThe Panasonic SD9 camcorder has a 37mm thread. Luckily I took a chance and ordered an adaptor, and I am so happy to say it worked. It is a 37mm adaptor to a T-mount. Which means that you can connect it to the Meade T-adaptor or any other connections such as a focal reducer and then onto the telescope.

Camcorder with T-mount 37mm adaptor attachedThe SD9 camcorder allows you to screw in the 37mm adaptor directly to the front of the camcorder, as shown in this accompanying image, although there is only space for the adaptor to be threaded on for about two turns.

Although there is another way to connect the adaptor to the camcorder.

Camcorder Lens Cover Removed and Tmount adaptor attached directlyIf you unscrew the silver lens cover there is a deeper 37mm thread depth available underneath it, and the adaptor can be attached to this, as shown in the image. 

The only downside to doing this is that you must be careful to not damage the camcorder lens as there is no protection for it. 

With there being a chance of scratching the lens whilst out in the dark fumbling about, I have ordered an UV 37mm screw-in lens for the camcorder in order to protect the camcorders lens.

Now I just need to try and do some videoing with the camcorder attached to the telescope to see what I get.

Panasonic SD9 CamcorderI have at last purchased a new digital high definition camcorder. I chose the Panasonic SD9 HD camcorder for it’s size, weight and functionality as well as price. I purchased it through Amazon and got a free 8GB SDHC card with it.

Once it arrived I was amazed by the small size of it and how light it was, especially compared to my 1st 8mm camcorder I bought 15 years ago which is now out of service.

This now means I have another option for recording astronomy, not just my webcam, Meade DSI Pro or Canon DLSR. The first thing I need to figure out is how to attach the SD9 camcorder to my telescope. I am hoping to find a simple 37mm threaded adaptor which will fit directly onto the front of the camcorder which will allow me to connect the other end as 1.25″ or 2″ eyepiece.

The manual mode of the camcorder does allow you to change the shutter times from 1/25 to 1/8000. This was useful for those night shots, especially when shooting the footage below that I took of the moon, which I took using a 1/4000 shutter speed via a tripod on full zoom which is 10x. You can also change the apeture setting as well. (From viewing these videos you will see that the viewing ratio has changed in YouTube as the moon looks a bit elongated, plus note you will not really see the HD quality on these videos).


There is a larger zoom than 10x, but this is digital and you lose quality and gain pixelisation when using digital zoom, so it’s not recommended to use it, and a good thing is that in the menu you can actually turn off the use of the digital zoom.


Viewing the files recorded in the AVCHD format is tricky, Windows Media Player will play the files but you may need to install special codec onto the PC to get it to work. Each file is located in a folder called “stream” as an .MTS file.

There is a supplied CD which allows you to first download the video footage to your PC and then edit it via an included program, which can output your video as MPEG2. Though as you have probably seen from the YouTube videos that the ratio is different as YouTube has squashed the videos.

The quality of the recordings are very good, the picture is clear and the sound good, but at the moment I don’t have an HD TV though, so I am probably not getting the best from the camcorder.

 There are other accessories to buy though such as macro lenses, so I have an idea of using the camcorder with a macro lens on and to record meteor showers by leaving the camcorder on a tripod and recording for 2hrs at a time, so then I should hopefully then get some footage of some meteors.

So far I can thoroughly recommend the Panasonic SD9 camcorder, the only downside at the moment is that spare batteries are hard to find and expensive. 

I purchased my Panasonic SD9 from Amazon, which I think was the cheapest although, it can be purchased from other online electrical retailers such as Currys and John Lewis.

My partial solar eclipse photo was also picked up by ITV Anglia News on the evening programme on 1st August 2008.

Thanks to Anglia News for sending me the video, as I missed it on TV.

My photo is the first image (Daniel Coe, Ely).

My Solar Ecliplse Image from 1st August 2008 on Sky News WebsiteSky News have also added my partial solar eclipse image to its website, I have taken a snapshot of the Sky News page below, click on the image to see it fullsize.

If you want to see the image on Sky News, (and hopefully the link still works), click here.

After taking my couple of photos of the partial solar eclipse I sent them to BBC Look East, and one of the images was shown on the TV in the weather section of the program along with other peoples photos as well.

Below is a video of the program, mine is the last photo in the stack.

I managed to get outside early enough to start taking some images today with my Canon DSLR and using a Meade f3.3 focal reducer and LX200 telescope. 

I did begin trying to use a webcam to record the whole event, as I would have liked to have had a video of the whole event, but with a lot of cloud and not being able to see the laptop screen outside, I gave up and used the digital camera instead.

My images show a mirror image as the moon passed the sun on the top left, and not the bottom right, maybe next time I should flip the images first in a paint program before displaying them.

Early Partial Solar Eclipse

Partial Solar Eclipsed, UK 1st August 2008