Archive for : June, 2009

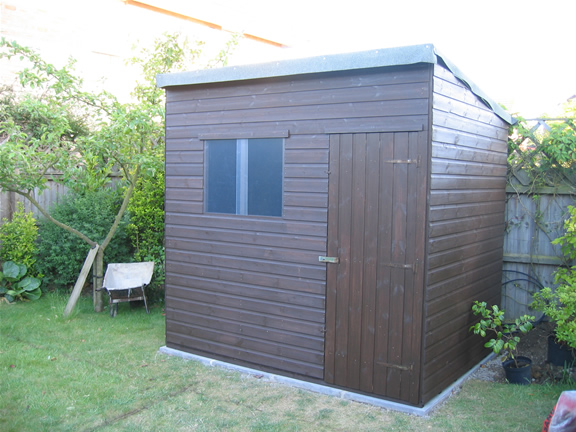
Insulating the Observatory Shed

Insulating the ObservatoryOnce the pent shed was erected, I then considered the insulation and the types of products I could use.

I went for 50mm polystyrene sheets which measured 8ft x 4ft, again I ordered these from Buildbase as they were a lot cheaper than Travis Perkins, at around £7.50 each inc VAT.

I also ordered some sheets of 6mm Plywood at the same time, as I wanted to cut the polystyrene sheets into the recesses of the shed and then have the plywood over the top. The plywood was the most expensive item at around £14 for a 8ft x 4ft board.

I ended up ordering 7 sheets of both, with the polystyrene cut and fitted, I had one board left over, so I actually only needed 6 sheets for the 8x6ft pent shed.

Cutting the polystyrene sheets was quite messy, and the garden now resembled in parts a snowy type of winter wonderland scene, with all the residue of the polystyrene balls everywhere. I actually cut the sheets with a saw, and it was really easy to do.

The only problem has been that the shed recesses are 40mm deep and the polystyrene sheets only come in 25mm and 5omm depth, so I now have the polystyrene sheets sticking out by 10mm.

To get round this I could have either thinned down the sheets, but a very messy job. I did think of cutting up polystyrene strips in 10mm depths, but again probably a difficult and messy job.  So I ended up cutting strips of plywood for one inner wall. I actually used 2 pieces back to back to layer up to the correct height.

On the other three inner walls I used some rough wood which came from Travis Perkins pallets, the wood actually spaces the main wood on the pallets. It was the correct width and depth, and they nicely let me take as much as this as I wanted.

So far I have insulated the whole of the shed including the door, but excluding the ceiling, I may insulate a part of this when I work out how I am going to have my roof open up, I may also insulate the main part of the ceiling with a thinner lighter silver reflective sheet, but we’ll see.

Celestron FirstScope Telescope Review

I found the Celestron FirstScope whilst on my travels around the web, and it looks like a well built mini tabletop telescope. It’s actually a mini Dobsian Reflector Telescope with a 76mm aperture and a focal length of 30cm.

Celestron FirstscopeThe write up says: “The FirstScope is a wonderful keepsake for anyone interested in astronomy. This quality Dobsonian style telescope features a 76 mm aperture reflector optical tube. The compact design makes it easy enough to take with you on your next outdoor adventure. FirstScope is also stylish enough to be a decorative fixture on your bookshelf or desk”.

Celestron FirstScope Features:

  • High quality Dobsonian style stand with a 76 mm reflector optical tube make FirstScope an ideal entry level astronomical telescope.
  • Portable and lightweight table-top design makes it easy to store, transport and setup your FirstScope Telescope
  • FirstScope is very easy to observe with, the user simply navigates the night sky by moving the tube in the direction of their desired object.
  • Stylish and decorative design makes FirstScope a wonderful keepsake for anyone interested in astronomy.

Official Product of International Year of Astronomy 2009!

Using the Celestron Firstscope TelescopeNamed Official Product of International Year of Astronomy 2009, FirstScope pays tribute to the men and women who brought us one step closer to understanding the universe around us!

In 1609, world-renowned Italian scientist, Galileo Galilei, introduced an elementary telescope to the growing astronomy community which sparked interest into the mysterious night sky for centuries to come. Four centuries later, in celebration of the International Year of Astronomy 2009, Celestron offers the portable FirstScope Telescope. The FirstScope pays tribute to Galileo Galilei and many of history’s most notable astronomers and scientists by displaying their names around the optical tube. We honor the contributions of these men and women, who brought us one step closer to understanding the universe around us.

FirstScope Specifications

Optical Design: Dobsonian Reflector
Aperture: 76 mm (2.99 in)
Focal Length: 300 mm (11.81 in)
Focal Ratio: 3.95
Eyepiece 1: 20 mm (0.79 in)
Magnification 1: 15 x
Eyepiece 2: 4 mm (0.16 in)
Magnification 2: 75 x
Weight: 1956.12 g

FirstScope Warranty

2 Years

You can buy the Celestron FirstScope at MyMemory for £54.99 inc Free Delivery.

Observatory Build – Putting up the Pent Shed

Slabs laid with Pier in placeSaturday I finished off the slab laying and painted the shed some more, to give it two coats all over. Sunday my father came to help me in the afternoon erect the pent shed, as this is definitely a two man/person job.

We began by marking out where to cut the hole in the base of the shed to leave the space for the pier. We then re-inforced the underside of the shed base with extra wood battens which I purchases separately. We did this because once we had cut a hatch in the floor, the floor lost a bit of it’s strength especially when walking near the edges of the hole.

This part actually took the longest time, as then we put the back of the shed on first, together with a side, and then the other side, and the front, all of wich went up quite quickly.

Observatory Shed in PlaceI was amazed at the actual height of the shed, I had ordered it to be 1 foot taller at the back and front, and I was worried that the Telescope won’t even see Polaris or anything else for that matter. Anyway next came sliding the roof on and then we put the felt on the roof, but perhaps next time I may put the felt on the roof before we put it on.

Then it was time to finish for day, I had left it water tight, whilst I decided and designed how I want my roof to open. Although there are still lots of jobs to do, including fixing the corner external vertical battens, putting in the windows, filling any holes, putting on the electric, touching up any bits I missed with the stain, and also get the shed lined and getting plywood put up, it’s not over yet!

Observatory Build – Drilling The Pier Holes

Saturday morning I carried on mixing cement and laying the slabs. At about 11am I had a break and went off to my local tool hire shop where I hired the SDS Drill and 110V to 240V converter to make the holes in the concrete for the pier bolts, which cost about £19 for the weekend.

I also called into ScopesNSkies where James lent me an 18mm drill bit for the pier holes. I had previously been into ScopesNSkies during the week to purchase the Pier Fitting Kit, which consists of 4 bolts, washers and nuts, you get the tube of resin included, but you will have to remember to get a metal gun for the tube of resin.

Observatory Pier Holes DrilledOnce I got back home, I drilled the 4 holes in the concrete. I was very worried about not making the holes in the correct place or drilling them at an angle. So I drilled one at a time then moved the pier into place and re-checked the other holes and re-marked them again.  A lot of concrete powder came out of the ground when drilling the holes, and I was advised to use my hoover to suck out the dirt left in the drill holes, as they need to be as clean as possible when putting in the bolts and resin. So I began looking for a piece of hosepipe to tape to the hoover attachment, but the hose pipe was too large to fit the drill holes, so instead I used a plastic tube which comes with those expanding foam cans.

I now needed to set the bolts in the holes with the resin in the kit, but I did not do this straightaway, I actually left it until the whole shed was put up.

Observatory Build – Laying the Slabs

It was now the weekend again, and the concrete has been left about a week to set. It was now time to lay the slabs for the base of the shed. All week during the evenings I have also been staining the shed. In the end I managed two coats on all sides of the shed, but boy I wish I had ordered the shed pre-treated, it may have cost a little more, but it would have saved me a lot of time.

I began the weekend by making a couple of small purchases late on the Friday night, firstly I purchased some Bitumen weatherproof gunk, to paint onto the concrete pier base, as I was worried about water sitting around the base of the pier. I also purchased a small tube of Ronseal Wood Filler to fill any holes in the shed where the knots had fallen out.

Observatory Build - Laying The Concrete Slab Shed BaseI had ordered 8 bags of sand (4 Sharp and 4 Soft) as well as 2 bags of cement for the 11 slabs I was laying.  I was worried I would not have enough sand, and all the builders merchants close at noon on Saturday near me, so may last chance to get more was around 11.45am (even though in the end I had 2 bags spare, so only used 6 bags). So because of this Friday night I laid 3 slabs just to work out how much sand and cement that had used, but it seemed I had ordered about enough. 

I finished off laying the slabs on Saturday (the next day). I actually purchased the cheapest slabs I could find which are Council slabs in grey, these come in two depths, but I went for the thinner ones as these are already heavy enough anyway, and the 600mm slabs are quite awkward to work with compared with the smaller 450mm slabs. I paid about £3.50 for the 600mm Council slabs from Buildbase. I ended up hand mixing the cement I needed to fix the slabs down in a wheelbarrow as then I could mix about the right amount everytime for one or two slabs.