The Monthly Sky Guide Book Review

Monthly Sky Guide BookThe Monthly Sky Guide 7th Edition by Cambridge University Press (ISBN 0521684358)

The Monthly Sky Guide contains a chapter on the main sights visible in each month of the year in the northern hemisphere.

The Monthly Sky Guide was first published in 1987 and it gets updated every few years, this 7th edition of The Monthly Sky Guide has details on planet positions and eclipses up to 2011.

At around 65 pages this book is not the largest astronomy book ever seen but it does contain a lot of useful information. The beginning of the book contains a useful introduction which answers questions such as what is a Star. What is a Constellation? How bright are the stars? etc. It also helps you to find your way around the night sky and describes how the night sky changes through the seasons.

Each month in turn provides you with a night sky map and details on key stars for the month, what the planets are up to together with any meteor showers or eclipses that are due that month. A particular constellation is then looked into in more detail, describing what to look for in that constellation.

Overall the maps are really useful and easy to read, The Monthly Sky Guide is an excellent book for anyone who wants to learn about the night sky and the constellations and know what major events are coming up in the next few years.

Monthly Sky Guide is available at Waterstones

The Sky at Night – Grand Collision

Sir Patrick Moore looks ahead to 2 billion years when the Milky Way will collide with another galaxy, Andromeda, an event which will destroy stars and planets but will eventually create new stars, solar systems and planets.

Dr Chris Lintott steps outside to look at Andromeda, easily visible in the night sky using binoculars. It is still 2.5 million light years away, but getting closer by the day.

Shown on BBC4 @ 7.30pm on Sunday 4th November 2007

Moon In My Room

Moon In My Room I found “moon in my room” whilst surfing around I am really tempted to buy it, ok so it’s bit of a toy, but the idea is really great, and it looks good too.

Moon In My Room – What could be cooler than having your own moon hanging up on your bedroom wall or ceiling? This fasinating moon with authentic detail shines just like the real moon in the twelve different lunar phases.

Using a mini remote control, you can smoothly glide through the twelve phases of the moon, or leave it on automatic and watch it glow from Waning Crescent to Waxing Gibbous and finally the New Moon. The light will automatically turn itself on in a darkened room, and off after 30 minutes; ideal for night-time wind-down, although it can be manually over-ridden.

Moon In My Room Lunar Phases

Moon In My Room is really easy to set up and no mains electrics are required. Just position the unit and use the wall mountings that are included in the box.

Moon In My Room also comes with an audio CD, explaining loads of exciting facts about the moon. Great for little astronauts.

Moon In My Room Box

Moon In My Room requires 4 AA and 2 AAA batteries. Diameter 26cm. For Ages 3+.

Moon In My Room features:

  • Remote controlled moon with 12 light-up phases.
  • You can control the Moon phases manually or leave it on automatic.
  • A built in light sensor; it will automatically start illuminating in a darkened room.
  • An auto shut-off mechanisum after 30 minutes of inactivity to save battery power. (Although you can override this feature if you wish)
  • Audio CD
  • Designed to be mounted on your bedroom wall via wall mountings.
  • Size: 26 cm x 26 cm x 6 cm

The cheapest place I could find it was at Prezzybox for £24.95

Comet Holmes 17P

I was glad to go out last night on Halloween and see clear skies as I was after having a look at the Holmes Comet after it had managed to get so much news coverage and at the same time come away with some images of the comet which is currently in the Perseus Constellation.

The Holmes comet can be clearly seen with the naked eye in the north and it makes a good sight in a good pair of binoculars, even low powered telescopes will get a good view. Apparently the explosion of Holmes was so big that the comet brightened by a factor of a million.

Holmes is currently moving away from the Sun, and is almost midway between the orbits of Mars and Jupiter. When I looked through my LX200 10″ you could clearly make out a circular cloud of gas and dust emanating from the nucleus of the comet, together with a brighter cloud of material.

These images were not taken using a telescope but with my trusty Canon 400D SLR with a 300mm lens with the camera on top of my telescope, most images were at f/5.6 on ISO400 with exposures of around 30 seconds.

Comet Holmes 17P

This second image of Comet Holmes below is a magnified image.

Comet Holmes 17P Zoom Image

It is not clear what caused the comet to shed its skin, since it is moving away from the Sun’s energetic influence. One possibility is that the comet was hit by a meteoroid, or perhaps there has been a build-up of gas under part of the surface that catastrophically ruptured the surface.

Comet Holmes is a regular visitor to the inner Solar System. It takes 6.9 years to orbit the Sun once. It made its closest approach to our star last May, passing by at some 300 million km (190 million miles).

Binoviewer Review

Binoviewers and caseLast week I was lucky enough to be able to borrow some binoviewers for a weeks use, from James at ScopesNSkies. I was very dubious that a pair of binoviewers could really give me a better view or increased viewing pleasure.

The binoviewers are just like a pair of binoculars that can be attached to the telescope. The main advantage of buying and using a binoviewer is that you can keep both eyes open whilst viewing and it seems as if we are more used to using binoculars than we are at viewing with just one eye.

Binoviewers from behindThe major disadvantage of the binoviewers is that you will have to buy two of every eyepiece, so increasing your costs.

On the other hand I can also see that the binoviewers are a brilliant idea if you have group observing sessions, such as when you want to have your family around to have a night observing with them, as I know the viewing will be greatly enhanced by the binoviewers as I am sure most people have used binoculars before and are used to using them.

BinoviewersThe eyepieces are held in place by a really nice half turn fixing, and the binoviewers are really well made and also quite heavy, I did find that the heavy weight was sometimes a problem when trying to secure the binoviewers into the diagonal when I wanted a really nice angular viewing angle.

The binoviewers took a while to get used to, as I was under the impression that you could put an eyepiece in and use it to get focus then take out the eyepiece and put it with your other matching eyepiece into the binoviewer and keep focus, but you can’t as the focus point has then changed.

Binoviewers with eyepieces insertedAfter a while of getting used to them I was amazed at how much extra you could see, or you thought you were seeing! Your field of view is very large when using the binoviewer as you are now using two eyes. The binoviewers are also very comfortable to use with some nice eye relief provided by your eyepieces.

The thing I was most impressed with was that I actually felt that what I was seeing was actually kind of 3D instead of a flat field kind of view you get with a single eyepiece. You do actually become more immersed into what you are looking at as well.

Binoviewers attached to LX200The binoviewers cost around £120, so are not a cheap purchase, although they do come with a set of eyepieces included. I think they are a bit of an extravagance but something that you may find will give you pleasing and improved viewing sessions.

Prime Focus Photography on LX200

With a number of clear nights in a row last week I managed to stay out for a number of hours and actually get used to using the LX200. I also managed to let the LX200 take me on some of the tours I uploaded from the Meade website.

Whilst out I managed to get some photographs using prime focus as well as using my camera bracket on top of my LX200 to get some shots with my Canon 75-300mm lens.

Camera Mounted Shots

Orion Nebula – 300mm

Orion Nebula - Canon SLR on top of LX200

M34 – 300mm

M34 - Canon camera on top of LX200

Andromeda Galaxy – 300mm

Andromeda Galaxy - Canon SLR on top of LX200

Prime Focus Photography on LX200

Ring Neblua – 70 sec exp. ISO800

Ring Nebula - Prime Focus - 70 second exposure

This shot of the ring nebula is a bit blurry, as it needed a lot of exposure time as without it I just could not gather enough light.

How To Connect an LX200 Telescope to a PC

I was quite amazed to find out that Meade still only allow you one way to connect your telescope to your PC, which is via an RS232 cable / 9 pin cable, the other end plugs into the RS232 slot on the LX200 base.

I would have thought by now that Meade may have added Firewire or USB to the LX200 range, but I must admit that RS232 is such a well known standard that it could be used for a while yet.

The only problem with serial connections on a PC is that some newer PC Desktops don’t have serial connections on their motherboards anymore, as I found out when I built my own new Core Duo PC earlier this year. Although most people probably don’t use a desktop PC with their Meade Telescopes unless they have PCs in their observatories, they would probably instead have a laptop. Another problem is that most newer laptops also don’t have serial connections, it seems now that the newer the laptop the less ports it actually has.

USB to RS232 Serial Cable
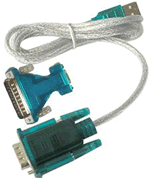
So what can you do? Well you’ll probably need a USB to Serial cable or adaptor. I went for the cable and purchased it on eBay. Once I had received the cable from Hong Kong which cost me about £4 including delivery I had to install the drivers. I found that the accompanying mini CD would not actually be read by my laptop cd drive, so I hunted around the internet for drivers, and I tried absoultely loads, but none of them worked, in the end I put the mini CD in my desktop PC and it read the disc ok.

But because some people may not have more than one PC I shall place the driver I used on this page in case I or anyone else needs it in the future.

The CD that came with the adaptor contained many different adaptors, but luckily the code of the driver folder required is actually the name on the adaptor cable at the serial end on the plastic sleeve.

USB to RS232 Serial Adaptor Driver

HS-232-340.exe – USB to RS232 Cable Adaptor Driver for Windows

Setting up your PC and Meade Software

Then just connect the cable you purchased to the supplied Meade LX200 cable and adaptor.

The Serial connection defaulted to COM Port 5, although the Meade software only really gives you the choices of COM1 – COM4, so I changed the COM port of the cable on the PC in properties of the cable to COM1 for ease of use.

Make sure that your PC COM port is set to the same as the Meade software Com port in order to get the telescope to talk to the PC.

The first thing I did once I got the PC drivers installed was to update the Autostar software to 4.2g and to upload the latest autostar tours, comets, asteroids and satellites. All of which were easy to install via the Meade control panel on the PC.

I finished off by updating my Autostar Update (AUS) Client Application Software to Version 4.6 on my PC, but you don’t need a usb to serial cable to do this.

Philip’s Moon Observers Guide Book Review

Moon Observers GuideAs you would expect the Moon Observer’s Guide (ISBN 0540084190) is a book all about our moon and a what a complete book it is. I think it must contain everything you ever need to know about the moon.

Moon Observers Guide contains chapters on lunar geology, the moon in space, lunar observer’s equipment, moon watching, recording your observations, eclipses and occultations, and the space-age moon.

The Moon Observers Guide contains a useful chapter which discusses the various type of telescopes you can use to view the moon and their advantages and disadvantages.

Throughout The Moon Observer’s Guide are some nice colour and black and white images and drawings of the moon.

A large section of the book follows the moon cycle through 28 days with each day containing a page about the part of the moon that is on show together with an image of that new section on show naming each section of the moon. This is just like having a moon map but split into days which is really good.

There are also chapters on how to record your observations using conventional photography, and digital photography including using camcorders, web cams and digital cameras. Finally there is a nice chapter describing occultations and lunar eclipses.

Overall this Philips title is really good and can be purchased on its own or within the Moonwatch pack which also includes a moon map and moon poster.

Moon Observer’s Guide is available at Waterstones

Daytime Moon

Whilst out in the garden at lunchtime I was amazed to see the moon at around 2pm in the western sky today, not something I get to see often, so I had to go and get my tripod, remote and 300mm lens out and here is what I took.

f/11, 1/500sec, 300mm, ISO200

Daytime Moon 4th October 2007 at 2pm

The Complete Guide To Stargazing Book Review

Philips Complete Guide To StargazingThe Complete Guide to Stargazing (0540089370) is an amazing astronomy book from Philips, which is more like an encyclopedia of astronomy, it’s certainly a coffee table kind of book which you could leave out and see lots of friends pick up and flick through.

The Complete Guide to Stargazing is a very large full colour astronomy book which contains hundreds of images both from NASA and from amateur astronomers alike.

The book was first published in 2006, but this review is based on the reprinted 2007 edition.

The Complete Guide to Stargazing contains eight chapters with a very large a-z of astronomy at the rear. The first chapter entitled ‘The night sky’ introduces you to the basics of the sky including details on wavelengths, distances of galaxies, about stars and how we view them.

The second chapter entitled ‘Getting Started’ introduces you to the night’s sky and how it moves, as well as the sun’s movement, scale of the sky and star brightness.

The third chapter is about equipment for observing, and discusses using binoculars for astronomy as well as teaching you about the various types of telescopes, mounts and how to get to know and use your telescope.

The fourth chapter is about our moon, and contains some great photos in it of the moon and the lunar landings. There are also useful moon maps included.

The fifth chapter is about the solar system and includes information on how to view the sun through a telescope via projection or by using solar filters. Many full colour images of each planet in turn are shown throughout the chapter including images from a distance and terrain images where available, and it’s nice to see amateur images making it into the book, some also detail what type of telescope took the image.

Chapter six covers stars and deep sky objects, again this chapter includes some brilliant images and tips on how to draw objects and photograph them.

Chapter seven is a very useful chapter covering the sky month by month with sky maps and images as well as full descriptions about each item.

The final chapter contains sky maps, and they have been laid out very well, as the left hand side of the page is a map page indicating the constellations and stars, whilst the right hand side of the page is a matching image of the real sky. This makes it really easy to learn the night sky.

Overall The Complete Guide to Stargazing is an amazing book with amazing images, a book which I’m sure most astronomers would love to have, and I can imagine this book being a great gift for anyone interested in astronomy at any age.

Complete Guide to Stargazing is available at Waterstones